Wednesday, May 13, 2009

Toast Sandwich


I am sorry for not posting regularly. Life's become a little busy these days. Also I am having some problems with blogger ever since I came back to India. Photos appear as html tags, still I go ahead and publish them as they appear normal in the blog.
Here's a simple and easy breakfast recipe that I learnt from my mil. It can be made ready in just a few minutes but mind you it tastes superb. I have added some grated cheese while taking this snap but the original recipe doesn't require cheese. Both ways it tastes great.

Ingredients

Bread
Onion - Finely chopped
Tomato - finely chopped
Coriander Leaves - finely chopped
Red Chilli Powder - as per taste
Turmeric powder - pinch
Salt
Grated Cheese - (optional)
Butter
Tomato Ketchup

Mix together onions, tomatoes, cilantro, salt, red chilli powder, turmeric pdr.
Take 2 slices of bread. Apply butter on one side of both slices. Take one slice and place some of the above mixture on the buttered side. Apply a small amount of ketchup on this mixture. Add some grated cheese if desired and cover with the other slice.
Heat a tava and fry it till golden brown using butter. Serve hot with additonal ketchup.

Note: Don't keep the onion-tomato mixture for too long after adding salt or else it leaves water. If this mixture has to be made in advance add salt just before making sandwiches.

Friday, April 24, 2009

Simple and yummy Egg Curry and my first awards.


Hubby loves egg curries. When in US, eggs were a must have in my refrigerator. I used to make 2 varieties of egg curry. This one is my mil's recipe and gets ready in few minutes itself. It tastes great with Jeera rice or plain rice.

Ingredients
Eggs -4
Coriander Seeds - 2tsp
Jeera - 1/2 tsp
Khus Khus - 1 tsp
Lavang/Clove - 1
Cinnamon - small piece
Freid Bedgi Chillies - 3 - 4
Coconut - 3/4th cup grated
Garlic - 1 big or 3-4 small cloves
Onions - 1 medium, chopped
Oil - 4 tsp
Coriander leaves- garnish

Boil eggs, remove shell and keep aside.
Fry coriander seeds, jeera, lavang, khus khus, cinnamon in 1/2 a tsp of oil and grind together with fried red chillies, coconut and garlic.
Heat 2-3 tsp of oil and fry the onions till pink. Then add the ground paste and water to make it into a gravy like consistency. Add salt.
In the mean while make 3-4 small slits on each boiled egg. Take care not to cut it into pieces.m
When the gravy boils add the eggs and garnish with chopped cilantro.
Cook for few more minutes.
Serve with naan or rice.

Aparna of Aps Kitchen and Suparna of Food Fascination have awarded me with these awards.


Thanks a lot Aparna and Suparna for these lovely awards.

Thursday, April 9, 2009

American Chopsuey


Few years back one of my college friends took us to this eatery in Ghatkopar and suggested that we try this dish. I found it very tasty but at the same time it was very very spicy. Years later I started craving for this dish while in US. I am not sure if the dish we tasted was actually American Chopsuey or something else. But from whatever I could remember I tried to recreate something similar. I couldn't recollect the exact taste that we tasted years back but my dish was definitely worth eating.
I made it twice thereafter and hubby too enjoyed eating it. Both times I boiled the entire pack of Hakka Noodles for making Veg Noodles and saved some boiled noodles for making this dish.

Ingredients
Hakka Noodles - 1/3 pack boiled as per instructions on the pack
Onions - Chopped lengthwise, 2 tbsp
Bell Pepper - chopped, 2 tbsp
Carrots - chopped lengthwise, 2 tbsp
Cabbage - chopped, 1 tbsp(optional_
Soya Sauce - 1 tsp
Chili Sauce - 1 tsp
Tomato Ketchup - 1 tbsp
Corn Flour - 1 tsp
Salt
Sugar - 1 tsp
Oil - 2 tsp

Deep fry the boiled noodles on low flame till crisp and slightly brown. Drain on kitchen towel.
In a pan take a some oil and stir-fry onions, carrots, cabbage, bell pepper till they are slightly cooked. Then add the sauces and salt and sugar. Adjust seasoning. Make a paste of corn flour with 1/2 a cup of water and add to the above. Cook for 2 mins till the mixture thickens.
To serve place some noodles in the serving bowl and top it with some of the above mixture. Serve hot.

Note: You can also use frozen mixed veggies and spring onions in place of onions.

Thursday, March 19, 2009

Lettuce Saag


I had never used Lettuce in my cooking. I brought it for the first time for making burgers for which I used only 3-4 leaves. I was left with a quite a big lettuce and started searching for recipes. All I could get were salad recipes which we are not very fond of.
Then suddenly I got the idea of using lettuce in place of Sarson in saag. I followed the Sarson ka saag recipe given to me by my NY neighbour ‘D’ aunty and replaced sarson leaves with lettuce. The outcome of the experiment was quite good and my hubby couldn’t even guess that it was lettuce.

Ingredients:
Lettuce – 1
Onion – 1 medium, finely chopped
Garlic – 3 cloves, chopped
Ginger – 1 inch, grated
Green Chillies – 2 finely chopped
Kasuri methi - 1 tbsp
Corn Flour – 2 tsp
Salt
Oil – 3 tsp

Boil water in a big vessel. Dip the lettuce leaves in the boiling water for 5 mins. Till they become soft. Remove the leaves and blend it to a fine paste.
In a pan, take some oil and fry the onions. When the turn translucent add the ginger and garlic. Continue frying till it turns brown. Then add the chopped green chillies and lettuce puree. Add salt and kasuri methi. Give it a boil.
Finally make a paste of corn flour and water and add it to the above. Heat for a minute or two and serve with hot phulkas or makki ki roti.

Note: For Sarson ka Saag use Sarson and Spinach leaves in the proportion 2:1

Corn Pizza

Seeing the variety of pizzas in the blogosphere I wanted to try my hand at a corn pizza.
I just followed my Pizza recipe for the dough and replaced ½ a cup all purpose flour with corn flour.
I used plain Heinz tomato ketchup instead of the homemade pizza sauce and used the same toppings as before, in addition I also used some chopped broccoli. The pizza tasted great but became a little dry at the base.


Tuesday, March 17, 2009

Hey Friends I'm back

Hi Friends...I'm back. I haven't disappeared from the blogosphere I just took a small break from blogging as I had no other option. I know its been quite long since I blogged any recipe. The reason for my absence is that we have moved back to Mumbai as my hubby's project assignment was over. Last few days have been very hectic for us. Now things have settled a bit. I am not sure if I will be able to continue blogging as before but I will try my best. Recently when I tried to put a post blogger was giving me some errors while putting pictures. Hopefully I will find out a solution soon.
Thanks for all your concerns and sweet comments my dear blogger friends and sorry for not being able to comment on your posts since the last few days.
Happy Blogging.
Enjoy.

Tuesday, February 24, 2009

Bread Halwa


This is a simple and tasty dessert also known by the name "Double Ka Meetha". I tasted this for the first time when my friend Nandini brought this for us. And I couldn't imagine that it was made from bread. This recipe belongs to her and needs a small quantity of ghee in contrast to the deep frying method which is usually followed for making this. My picture doesn't do justice to this yummy dessert. I will update it the next time I make it.

Ingredients
Bread slices - 3, cut into small pieces
Ghee - 1 1/2 tbsp
Sugar - 8 heaped tsp
Water - 3/4 cup
Milk - 2 tbsp
Nuts - cashews, almonds, raisins
Cardamom Powder - pinch (optional)

Make a sugar syrup with the above quantities. The syrup should be of one string consistency but I heated it only till it was sticky.
In a pan(preferably a flat one) heat ghee and roast the nuts. Remove and keep aside. In the same ghee roast the bread slices on a low flame till golden. Then add the sugar syrup. Do not stir. In the mean while boil the milk. When the sugar syrup gets absorbed add the milk, cardamom powder and nuts. Mix it slowly. Preferably serve hot.

Thursday, February 19, 2009

Rajma Chawal


I always get confused with this name. During college days my Punjabi friend Gurvinder(...ok lets refer to her as Priti...thats what she preferred to be called)...used to bring this yummy dish in her lunch box and we all used to relish it. Punjabis have a unique style of cooking. All their dishes taste simply great. Even if we make the same dish at home it lacks the Punjabi touch. Ok coming back to the topic her rajma chaval was a single dish in contrast to the usual rajma gravy which is eaten with rice. But in those days i was not so much into cooking so I never bothered to ask her the recipe.
Few days back I made rajma curry for which I boiled some rajma. But even after making enough gravy I was left with some more boiled rajma. So I made this One pot meal the next day.
This is not the authentic recipe. I have just added a few masalas and the dish turned wonderful. So I thought of posting it.

Ingredients
Boiled Rajma/Kidney beans - 1 cup
Boiled Rice - 2 cups
Onion - 1 medium, cut lengthwise
Ginger paste - 1 tsp
Garlic Paste - 1 tsp
Tomato - 1 medium, pureed
Kasuri Methi - 1 tbsp
Kitchen King Masala - 1/2 tsp
Biryani Masala/Garam Masala - 1/2 tsp
Chilli Powder - 1/2 tsp
Cumin-Coriander Powder - 1/2 tsp
Turmeric Powder - 1/4 tsp
cumin seeds - 1/2 tsp
Cilantro - few
Salt
Oil - 3 tsp

Heat oil in a pan. Add cumin and when it crackles add onions. Fry till it turns golden. Then add the ginger and garlic paste. fry till the raw smell goes and then add the tomato puree. Fry for 3-4 mins. In the mean while add all the spice powders. Finally add the boiled rajma, rice and kasuri methi and adjust salt. Add some chopped cilantro. Mix all together cook for a minute or two and serve hot.

Rava Dosa


Rava Dosa is a thin dosa with a lace like texture. Each person uses different proportions of ingredients for making this yummy dosa. I always follow my mil's proportions from whom I learnt to make this. This is one of my favourites as it is comes out very crisp and doesn't need fermentation.

Ingredients
Maida/All Purpose Flour - 1/2 cup
Rice Flour - 1/2 cup
Rava/Semolina - 1/4 cup
Green Chilly - 1, cut into thin slices
Jeera/Cumin Seeds - 1/2 tsp
Salt
Oil

Mix both flours and rava and add enough water to make a thin batter. This batter must be thinner than ordinary dosa. Add salt to the batter.
Heat 2 tsp of oil and add jeera. When it begins to crackle add the chopped green chillies. Fry for a minute and add it to the batter.
For making dosas, heat a non-stick tava. Smear with 1/2 a tsp of oil. Take a ladle full of batter and pour from a height of 5-6 inches in a throwing fashion(just like neer dosa). Do not shape it as ordinary dosa. Cook on medium flame till it gets golden.
Serve with your favorite chutney/sambhar.
The above quantities make 7-8 dosas.

Note: Green chillies can be be added directly to the batter.

Wednesday, February 18, 2009

Egg in the Hole


When people ask me if I am a veg./non-veg. i dont know what to answer. Eggs are still a controversial topic. Some believe them to be veg and some don't. I prefer saying that I am an Eggetarian but still have blank faces starring at me. Not sure if such a word exists. I guess it should be Lacto-Ovo-Vegetarian but then that would be even more complicated for a layman to understand.

My egg consumption has increased after marriage and particularly after coming to US. Previously it used to be 1-2 eggs a year and now its 1-2 eggs a week. I always keep some eggs handy.
Egg in the hole/Egg in the basket refers to an egg which is fried in the hole of a bread. I came across this dish many months back while browsing the web. Since then I have made it many a times as it doesn't require any advance planning. I mostly make this as an evening snack. This is just my way of making them.

Ingredients

Bread slices (White or Brown)
Eggs - 1 per slice
Pepper Powder
Chilli Powder
Salt
Oil/Butter
Tomato Ketchup and Sriracha Chili Sauce - for serving

With the help of a cookie cutter or glass, make a hole in the bread slice. The hole should be big enough to accommodate an entire egg but the bread should still be intact.
Heat a non-stick pan. Add little oil or butter. Now place the bread on it. Break an entire egg directly into the hole. Cook this on a very low flame. Also fry the hole of the bread.

Sprinkle salt,pepper powder and chili powder.
Once it is fried from below drizzle some oil on top and slowly flip it. Add the spice powders. Fry this side also. Keep flipping till it is well cooked. Enjoy with ketchup.

Note: To check if it is cooked from within insert a knife in the center. If it is gooey cook for some more time. You can also leave it a little raw as per your choice.

Tuesday, February 17, 2009

Basundi


This recipe was given to me by my friend S during one of our chat sessions. S and i met in a party here in US and since then we have chatted a few times. During one such session about 6 months after we first met we were surprised to know that we worked in the same company on the same floor while in India. The world is a small place afterall. Anyways coming back to the recipe S praised this recipe so much that I had to try this. After postponing it for many days I finally made it on our anniversary. It turned out very delicious. I also added some home-made anguri the next day and changed it to Anguri Basundi.
This happens to be my 50th post and I wanted to announce it with a sweet dish. I hope I can post many more recipes and learn many new ones on this endless journey of blogging.

I used half of the quantities mentioned in the original recipe and have changed the proportions slightly.

What I used :
2% Milk - 1 1/2 cups (3 cups As per Original recipe)
Half and Half - 1 Pint (3 cups As per Original recipe)
Heavy Cream - 1/2 pint (400 ml As per Original recipe)
Sugar - 1/2 cup (1 cup As per Original recipe)
Cashews and Almonds - coarsely powdered/ sliced
Cardamom Pdr

In a pan with a heavy bottom or a cooker boil the milk and half and half. Once it boils add the Cream. Again bring this to a boil, reduce the flame and continue heating till the mixture reduces to half its original volume. This may take some time. Keep stirring in between to prevent it from sticking to the bottom. When the milk has reduced to half the quantity the colour changes to pinkish. Now add the sugar and continue boiling till the sugar gets dissolved. Finally add the nuts and cardamom powder and relish it just like that or with anguri.
To make Anguri I followed my rasmalai recipe but made the malai balls very small(1 cm in diameter) and did not flatten them. Then added them to the basundi.

Tastes best after refrigerating for a day or two.
Thanks S for the recipe.

Thursday, February 12, 2009

Kitchen Tips

The following are the tips that I have learnt from my amma, mummy, some sites and personal experience and since then have adopted them in my kitchen. Here I have added only the ones which I follow. I will update this post as and when I come across new ones. Hope you find this section useful.

Freezing tips
Following is the list of items which i have been successful in freezing.

Carrots, French Beans, Beets. - Wash them well, dry them on a kitchen paper, cut them into the desired sizes which you require for a particular recipe, Put them into ziplock bags and freeze. For peas I buy the readymade frozen ones. The same procedure can be followed for the fresh ones also. I think cauliflower and broccoli can also be stored by this method but i have never tried that. Spinach can also be stored similarly but it becomes very soft on thawing. Same is the case with Green Chillies. They too become very soft on thawing but can be used for curries which doesn't require chillies to be chopped.

Pulses can be sprouted in advance and stored in ziplocks in freezer.

Home-made paneer can be cut into cubes and stored in freezer.

Curry leaves can be stored for a longer time by drying them in shade. When they become fully crisp store them in boxes. The dry ones need not be stored in the refrigerator. By this method curry leaves lose their colour slightly but are very good for making chivda as they have no moisture. I use the dried ones in all my dishes.


Cooking tips
When boiling dal directly in a pressure cooker add some oil to it to prevent the dal from oozing out of the whistle.

When frying onions if a little salt is added to it, the process becomes quicker.


Cleaning tips
If the cooker becomes dirty from inside try pressure cooking a lemon rind with some water for 1-2 whistles. The cooker becomes clean.

For stubborn stains and residues on the gas burner and platform sprinkle some baking soda, leave it for a min or two and then scrub with a cloth or a plastic scrubber.

If your metal scrubber catches rust, after use put it in a plastic bag and place the bag in the freezer. Use when required and place it back in the freezer. This prevents the scrubber from catching rust.

Wednesday, February 11, 2009

Rasmalai


I am posting a recipe after nearly a week. There is no particular reason behind it. Its just that I am nearing the 50th post and i wanted the next two posts to be special. But today I had to post this as today is a special day for me. Its my 2nd wedding anniversary and Rasmalai is my hubby's favorite dessert. Before marriage I had never tasted Rasmalai. The sweet shops near my home never kept this sweet even though it is so popular. But after I got married I got to taste it many a times from the famous Brijwasi Sweets in Mulund and I absolutely loved it.
When we came to US i made many attempts to create this sweet dish at home. I tried different methods like using the instant mix, readymade rasgullas and also from scratch. But all of them failed. The ready-to-eat frozen ones were quite good but the rabdi was too thick and it had a different taste from the ones we used to eat in Mumbai.
One day I thought of giving it a final try and this time I chose Vah Chef's recipe. I am thankful to myself for choosing his recipe. My rasmalai turned just perfect.
One thing that we have noted is that these rasmalais taste best after 2-3 days when the ras gets nicely absorbed into the malai balls.

For the Ras
Whole Milk - 4 cups
Sugar - as per desired sweetness
Dry Fruits - Cashews, Pistachios, Almonds - 1tbsp each - coarsely powdered
Cardamom Powder

Take a pan with a heavy bottom. Add the milk. Bring it to a boil and simmer till it reduces to half its original volume. Then add sugar to obtain desired sweetness. Finally add the powdered dry fruits.

For the Malai balls Milk - 3 cups
Lemon juice or Vinegar - 1 tbsp (I mostly use vinegar)
Ice cubes
Sugar - 1 small katori

In a pan with a thick bottom boil the milk. Dilute the vinegar with very little water and add to the milk. The milk will start to curdle. (Add little more vinegar if required but do not add too much as it has a strong smell)

When it curdles completely(whey water is clear) switch off the flame and immediately add ice cubes. Then strain this through a muslin cloth or a new handkerchief. Wash the paneer well. Squeeze as much water from it as possible. Tie a knot to the cloth and hang it for about 20 mins.
After 20 mins take the paneer and rub it well. Then knead it like a chapati dough.
Make small smooth balls of about 1 inch diameter and slightly flatten to make discs. Makes around 12 discs.


Boil water with sugar in the ratio of 6:1. I use a very small katori (less than 1/2 cup) of sugar and 6 katoris of water.
When sugar has dissolved and the mixture starts to boil add the discs and cover with a well fitting lid.

Keep the flame on high throughout. You can make it in 2-3 batches and the discs double in volume.
After 5 mins open the lid and carefully transfer the discs into lukewarm water. Then squeeze the discs slightly and transfer into rabdi. Refrigerate for atleast 1 day for best results.

What I usually do is make the malai balls at home and use the Gits Rabdi mix for making the rabdi. In this manner Rasmalai gets ready in a jiffy. I have tried this with 1% and 2% milk also and haven't noticed much difference in the taste.
My hubby says that my rasmalai tastes even better than the Brijwasi ones. Now that is the best compliment that I have received till date.

I am dedicating this post to my dearest hubby and sending this to Just For You event at Alka's blog.

Monday, February 2, 2009

Pani Poori


Pani Poori/Poochka/Gol Gappa doesn't need an introduction. It is the favorite chaat item of many including me. I can never say NO to a pani puri. Initially I used to eat chaat and other fast foods only at restaurants but after studying Microbiology in college and gaining knowledge about food contamination, to my surprise I found myself eating more of street foods. I have eaten Pani Poori innumerable times while coming back from office even when my tummy was full, all thanks to one of my train friends P who would drag us to the Pani poori wala and treat us with Pani puris without any occasion. One place in Ghatkopar serves Pooris with chilled Pani which have small pieces of ice also. I love that version also.
During my initial months in US I used to have cravings for chaat and especially Pani Puri. On the contrary my hubby is not a great fan of chaat items. While in India I used to make Pani Puri, Sev Puri, etc many a times at home using the readymade puris. But after coming here I never made it as we get huge packs of puris here which is too much for the two of us.
Once I was chatting with my friend S and I informed her about my food blog. She was very excited and told me to include chaat recipes in my blog. She also gave me the recipe to make puris at home. Few days later we went to visit the Indian Street in New Jersey. There I ordered Pani Poori but was quite dissapointed with its taste. I challenged hubby that I can make better ones than them. All these years I always followed a particular recipe from a paper clipping to make the pani. But I lost the recipe or maybe its lying somewhere in India. This is how I made it with whatever I could remember.

Ingredients
For the Puri
Maida/All Purpose Flour - 1/2 cup
Rava - 1/4 cup
Salt
Oil

Mix Maida and Rava. Add a little salt and water and make a stiff dough. Apply a little amount of oil and rest it for half an hour. Roll it into a chapati (I did this on a wax paper) as thin as possible using OIL. Cut out small roundels using a cookie cutter (or a small lid).

Deep fry in hot oil till crisp and golden.

For Pani
Mint - 1 small bunch fresh (I used 2 tbsp of dried leaves)
Ginger - 1 inch
Cardamom - 2
Cloves - 2-3
Pepper - 2
Green Chilli - 1-2 depending upon its spicyness
Jeera - 1 tsp
Rock Salt- 1/2 tsp (I used Chaat Masala)
Salt

Blend all together with water. Add more water and strain it to obtain Pani.

For Meetha Chutney
Seedless Dates - 7-8
Tamarind - small ball (1 inch diameter)
Jaggery - 2-inch piece
Pinch of Salt

Soak the dates and Tamarind seperately in little warm water. Strain the tamarind water. Blend together dates, tamarind water and jaggery to a fine puree. Add a pinch of salt.

For Filling use any or all of the items below.
Yellow Peas - soaked and boiled with salt and turmeric till soft
Moong Sprouts
Boiled and Mashed Potatoes - add a pinch of salt and red chilli powder
Soaked Boondi
Dahi
Thin Sev

For making a Pani Poori.- Make a hole in the poori, add filling of your choice and top it with Meetha Chutney. Dip in/top it with the pani and enjoy your poori in one go.


Clockwise from top: Boiled Potatoes, Boiled Peas, Tikha Paani, Meetha Chutney, Soaked Boondi and the final poori in the centre.

Hubby loved it much more than me and also commented that my Pani Pooris were indeed much better than the restaurant ones.

Friday, January 30, 2009

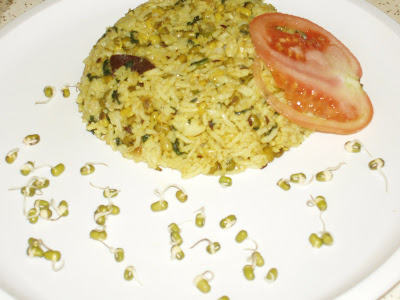
Sprouted Moong Pulao


This recipe is from my recipe collection. I wanted to try it from a long time. More than the recipe, the picture tempted me to try this out and I am glad I tried it as it was quite good. The sprouts and spinach make it healthy too.

For the rice:
Uncooked Basmati Rice - 1 cup
Bay Leaves - 2
Cumin seeds - 1/2 tsp
Cinnamon - 1 stick
Cloves - 2
Turmeric - pinch
Oil - 1 tbsp
Salt

For the sprout mixture:
Moong Sprouts - 1 1/2 cups
Onion - 1 chopped
Green Chilli - 1
Spinach leaves - 1 1/2 cups, chopped
Oil - 1 tbsp
Salt

For the rice: Heat oil and fry bay leaves, cumin, cinnamon and cloves for a few minutes. Add washed rice, turmeric and salt and fry for 2-3 mins. Add 2 cups water, cover and cook. [This can also be done in a pressure cooker]

For Sprout Mixture : Heat oil and fry onion and green chilli for 2 mins. Add sprouts and cook for 2-3 mins. Add spinach and again cook for 2 mins. Add a little salt if needed.
Add cooked rice and mix well. Serve hot.

Note : I used around 1 cup each of moong sprouts and spinach and also added a little water for the moong to cook well in the sprout mixture.

I am sending this to My Legume Love Affair Seventh Helping and FIC yellow


Thursday, January 29, 2009

Cucumber Soup


Right from my college days I had this hobby of collecting recipes from newspapers. I have made a scrapbook with all the recipes but hardly tried any of them. I brought this book with me while coming to US thinking that it may help me in my cooking.
This recipe is from one such paper cutout. It is called Cold Cucumber Soup. I made a few changes to the original recipe and we had it as a hot soup as we were in no mood to have a cold soup in this chilly winter. My hubby loved this soup and wanted me to post it here.

Ingredients:

Cucumber - 1 big, peeled and grated.
Onion - 1 very small, chopped
Milk - 1/4 cup
Butter - 1 tsp
Pepper Powder
Corn Flour - 1 tsp
Lemon juice
Edible Green Colour - 1 drop (optional)
Salt

1. Heat butter in a pan and saute the onions.
2. Add grated cucumber and little water and boil for few mins.
3. Let it cool a little and then blend it in a blender until smooth.
4. Transfer it to a pan and add milk and give it a boil. Add more water if necessary.
5. Add salt, pepper and green colour.
6. Mix corn flour in little water and add this to the soup.
7. Simmer the soup for a few mins.
8. Squeeze some lemon juice just before serving and serve hot.

Variation: According to the original recipe the soup is strained at Step 2 and is served as a chilled soup. The rest of the procedure remains the same.

Wednesday, January 28, 2009

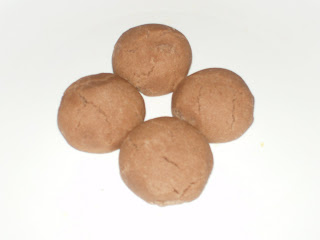
Choco-Narayankataar


Nankatayi is called Narayankataar in Konkani. As I said before this is birthday season for our family. Today happens to be my brother's (Harish) birthday. I promised to make something special for him. I had recently baked a cake so did not want to make a cake again. But I wanted to make something with Chocolate as it is his favorite flavor. Whenever he brings home an ice cream it has to be chocolate flavor unless he brings two of them. I thought of making a Chocolate Walnut Fudge but realised that it required condensed milk which I did not have.
Finally I decided to make Shilpa's Nankatayi .I wanted to try these since the past many months. I converted it into a Chocolate Nankatai by adding some Cocoa to the dough. I followed her recipe exactly, only added a tbsp of Cocoa powder in addition to get that Chocolatey flavor. I was a bit skeptical about it as I always manage to mess up with cookies. I have tried 2-3 different types of cookies till date but they always spread and become rock hard. This time something different happened. I baked it for the required time and also got the cracks on top which was the indication that the cookies were ready. But they still appeared soft. I felt that they would become crisp after they cool down. On cooling they were not as soft but they are still quite fragile. I wonder if Nankatayis are ought to be like that or if I have messed them up this time too.
But this time I am satisfied with the outcome as they taste wonderful and have a nice aroma of ghee. I am sure my brother would have loved it.


I wish him a very Happy Birthday and a happy and bright future.

Monday, January 26, 2009

Treating myself with a cake


Its the birthday season for our family. It was my mil's birthday on Saturday and mine on Sunday. We went to the temple and had our lunch at the nearby newly opened restaurant. We both love their rasam soup very much so this time also we ordered the same. The lunch was also good but I was full very soon.
Now coming to the cake, I thought of making a Black Forest cake to celebrate both occasions. I used Betty Crocker's SuperMoist Fudge mix for the cake and whipped cream for the icing. Previous time I used the Maraschino cherries but didn't like the smell of it so thought of using the cherries from the Cherry-pie filling. But these were slightly sour in taste. I think the first option was only better. I used only a few cherries as I made a small 2 layer cake. So the sourness wasn't noticeable. I topped it with some grated Milk Chocolate as that was the only one I had with me, though a dark chocolate bar would have given me the perfect colour for the Cake.


The cake was ready in a jiffy and was very yummy. I liked this much more than the one I made before as I used Whipped cream this time while the previous time I used a readymade frosting.

Friday, January 23, 2009

Cheppi Surnalli


Surnalli is a thick dosa. Cheppi in Konkani means bland. That doesn't mean this dosa has a bland taste. It is only used to differentiate it from Godi Surnalli which is sweet. As I have mentioned before Surnalli can be made using watermelon/cucumber/ash gourd. This time I have used cucumber.
Surnalli is my favorite among all dosas. Amma always made the sweet version of surnalli as she knows that I love it. But recently I tried the Cheppi Surnalli and we liked this one too.

Ingredients:
Rice - 1 cup
Dessicated Coconut - 1/3 cup
Cucumber - 1 small or half of big one.
Poha (thick or thin) - 1 /4 cup
Bread slices - 2
Salt
Turmeric - pinch(optional)

Soak rice for 2-3 hours. Remove the skin of cucumber and chop it into small pieces.
Soak the poha and bread in little water.
Grind all ingredients except salt into a fine batter adding water. The batter shouldn't be too thin. The consistency of the batter must be thicker than regular dosa batter.
Ferment overnight or atleast 8 hrs.
Next morning add salt and mix well.
I also add a pinch of baking soda to the batter as the batter doesn't ferment well in winters.
Adding just a pinch of soda gives nice fluffy surnallis.

Heat a tava or non stick pan. Add a few drops of oil/butter. Pour a ladle of batter in the center of the tava. Do not spread the batter. Drizzle some oil on the sides. Cover and cook till it gets golden from below.
Serve with your favorite chutney or sambhar. Don't forget to top it with a dollop of butter.
You can also make small mini surnallis for kids.

Note: Surnallis are usually cooked only on 1 side. But I like to cook it on both sides. For making the sweeter version of this just add some jaggery in addition to the other ingredients while grinding the batter.

Sending this along with Undi to "Harvest the festival of Rice" event.

Also sending this to FIC - Yellow Event at TongueTicklers.

Hummus


I had some leftover boiled kabuli channa after making Chole and I was in no mood to eat Chole the next day as well. Suddenly the idea of making hummus struck me. When I searched for the recipe I found that to make hummus you require tahini.
I didn't have tahini instead I added some sesame seeds. My silly experiment became sucessful and my hubby liked it a lot.

To make my modified hummus :
Blend 1 cup of boiled chickpeas with 1 tbsp of sesame seeds, little paprika, salt, 1 clove of garlic and some lemon juice. Add little water if needed.
Serve as a dip with nachos or chips.

Note: The original recipe has Olive oil also. As I did not have it I haven't added it.

I am sending this to JFI: Chickpeas event and also to Chutney/Dip Mania event

Thursday, January 22, 2009

Pizza


Who doesn't love a pizza. It happens to be the only western food that I love as it is not as bland as the other foods. So whenever we go out we look for pizza outlets.
During my initial days in US once we went to Target. After all the shopping we ordered a Cheese pizza. Compared to all the pizzas I have eaten till date, the target cheese pizza happens to be my favorite. It is a simple Cheese pizza but is very soft and rich. I haven't tasted such soft pizza elsewhere. But that day when I opened the pack there was a pizza with red roundels starring at me. I thought it to be tomato slices. To be sure I asked my hubby who was shocked to see the ham slices. We returned it back and luckily we got our money back.
Few months back my mil had come to visit us. On one weekend we set out to visit Manhattan. When we were hungry we settled at a pizza outlet. Hubby ordered Mushroom and Spinach pizza. When I was about to take a bite I noticed a red piece hanging from it. Again it was a piece of ham that got stuck to my veggie pizza. We had already cut the pizza so this time we couldn't get our money back. Nowadays I am very careful whenever we eat out. I thoroughly inspect the food before having a bite.

For making this pizza I have taken tips from Shilpa's Garlic Pizza and from Vah Chef's videos.

Ingredients :
For the base
Maida/All purpose flour - 1 1/2 cups
Whole wheat flour - 1/2 cup
Salt
Sugar - 2 tsp
Warm water - 1 cup
Oil - 2 tsp
Active dry yeast - 1 envelope

Take 1/4 th cup of warm water. The water should be warm not hot. Add the sugar. Mix and then add the yeast. Leave it to rise for about 10 min. Bubbles will appear which is an indication that yeast is active.
Then add the remaining water(warm) and salt.
Take the flours in a big bowl and add the water little by little and form a dough. Knead well. The dough will be sticky. Add the oil and again knead well.
Cover it with a plastic and rest in a warm place for an hour.
After an hour the dough doubles in volume. Punch the dough to remove the air.
Again rest it for half an hour.
Now spread the dough on a pan or pizza stone.


For the sauce
Tomato - 2 medium
Capsicum - 1/2, chopped
Garlic - 1 big, chopped finely
Butter - 1 tsp
Salt
Sugar - 1/2 tsp
Red chili powder - 1/2 tsp
Pepper powder - pinch

Make small cuts on tomato and put in boiling water for 30 sec. Remove and put in cold water. Peel off the skin. I cut one tomato into pieces and pureed the other one.
Heat butter in a pan. Add garlic and fry. Then add the capsicum pieces. Fry for a minute and add the tomato pieces. Fry and add tomato puree. Now add salt, sugar, pepper powder, chilli powder.
I also added 2 drops of red food colour. Cook till the desired consistency has reached.

For assembling a pizza.

I spread the dough on a non stick pan without a handle. Spread the sauce on top and topped it with onions, bell peppers, mushrooms, shredded cabbage and mozzarella cheese and dotted it with oil.
I heated the pan over a low flame for about 5 mins and then baked in oven at 450 F till the cheese melted.
Garnished it with chilli flakes, pepper powder and dried parsley.


With a remaining dough I made a thin crust pizza and topped it with paneer in addition to the toppings used above.

Both pizzas were absolutely delicious and it was a great experience to make it from scratch.

Note: Adding herbs like oregano and basil gives a nice flavor to the sauce. As I did not have any of those I haven't added it. I have used Imitation Mozzarella Cheese in place of Mozzarella as it is low in Cholesterol. I have also added a few pieces of fried garlic to the dough.

Update: I am sending this to Bread Mania event at Sindhura's blog