Friday, January 30, 2009
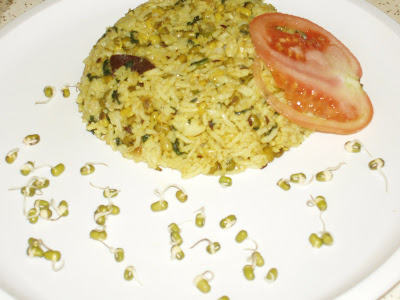
Sprouted Moong Pulao
This recipe is from my recipe collection. I wanted to try it from a long time. More than the recipe, the picture tempted me to try this out and I am glad I tried it as it was quite good. The sprouts and spinach make it healthy too.
For the rice:
Uncooked Basmati Rice - 1 cup
Bay Leaves - 2
Cumin seeds - 1/2 tsp
Cinnamon - 1 stick
Cloves - 2
Turmeric - pinch
Oil - 1 tbsp
Salt
For the sprout mixture:
Moong Sprouts - 1 1/2 cups
Onion - 1 chopped
Green Chilli - 1
Spinach leaves - 1 1/2 cups, chopped
Oil - 1 tbsp
Salt
For the rice: Heat oil and fry bay leaves, cumin, cinnamon and cloves for a few minutes. Add washed rice, turmeric and salt and fry for 2-3 mins. Add 2 cups water, cover and cook. [This can also be done in a pressure cooker]
For Sprout Mixture : Heat oil and fry onion and green chilli for 2 mins. Add sprouts and cook for 2-3 mins. Add spinach and again cook for 2 mins. Add a little salt if needed.
Add cooked rice and mix well. Serve hot.
Note : I used around 1 cup each of moong sprouts and spinach and also added a little water for the moong to cook well in the sprout mixture.
I am sending this to My Legume Love Affair Seventh Helping and FIC yellow
Thursday, January 29, 2009
Cucumber Soup
Right from my college days I had this hobby of collecting recipes from newspapers. I have made a scrapbook with all the recipes but hardly tried any of them. I brought this book with me while coming to US thinking that it may help me in my cooking.
This recipe is from one such paper cutout. It is called Cold Cucumber Soup. I made a few changes to the original recipe and we had it as a hot soup as we were in no mood to have a cold soup in this chilly winter. My hubby loved this soup and wanted me to post it here.
Ingredients:
Cucumber - 1 big, peeled and grated.
Onion - 1 very small, chopped
Milk - 1/4 cup
Butter - 1 tsp
Pepper Powder
Corn Flour - 1 tsp
Lemon juice
Edible Green Colour - 1 drop (optional)
Salt
1. Heat butter in a pan and saute the onions.
2. Add grated cucumber and little water and boil for few mins.
3. Let it cool a little and then blend it in a blender until smooth.
4. Transfer it to a pan and add milk and give it a boil. Add more water if necessary.
5. Add salt, pepper and green colour.
6. Mix corn flour in little water and add this to the soup.
7. Simmer the soup for a few mins.
8. Squeeze some lemon juice just before serving and serve hot.
Variation: According to the original recipe the soup is strained at Step 2 and is served as a chilled soup. The rest of the procedure remains the same.
Wednesday, January 28, 2009
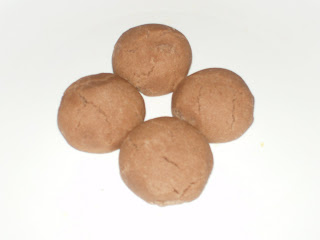
Choco-Narayankataar
Nankatayi is called Narayankataar in Konkani. As I said before this is birthday season for our family. Today happens to be my brother's (Harish) birthday. I promised to make something special for him. I had recently baked a cake so did not want to make a cake again. But I wanted to make something with Chocolate as it is his favorite flavor. Whenever he brings home an ice cream it has to be chocolate flavor unless he brings two of them. I thought of making a Chocolate Walnut Fudge but realised that it required condensed milk which I did not have.
Finally I decided to make Shilpa's Nankatayi .I wanted to try these since the past many months. I converted it into a Chocolate Nankatai by adding some Cocoa to the dough. I followed her recipe exactly, only added a tbsp of Cocoa powder in addition to get that Chocolatey flavor. I was a bit skeptical about it as I always manage to mess up with cookies. I have tried 2-3 different types of cookies till date but they always spread and become rock hard. This time something different happened. I baked it for the required time and also got the cracks on top which was the indication that the cookies were ready. But they still appeared soft. I felt that they would become crisp after they cool down. On cooling they were not as soft but they are still quite fragile. I wonder if Nankatayis are ought to be like that or if I have messed them up this time too.
But this time I am satisfied with the outcome as they taste wonderful and have a nice aroma of ghee. I am sure my brother would have loved it.
I wish him a very Happy Birthday and a happy and bright future.
Labels:
Cookies,
Cooking from other blogs
Monday, January 26, 2009
Treating myself with a cake
Its the birthday season for our family. It was my mil's birthday on Saturday and mine on Sunday. We went to the temple and had our lunch at the nearby newly opened restaurant. We both love their rasam soup very much so this time also we ordered the same. The lunch was also good but I was full very soon.
Now coming to the cake, I thought of making a Black Forest cake to celebrate both occasions. I used Betty Crocker's SuperMoist Fudge mix for the cake and whipped cream for the icing. Previous time I used the Maraschino cherries but didn't like the smell of it so thought of using the cherries from the Cherry-pie filling. But these were slightly sour in taste. I think the first option was only better. I used only a few cherries as I made a small 2 layer cake. So the sourness wasn't noticeable. I topped it with some grated Milk Chocolate as that was the only one I had with me, though a dark chocolate bar would have given me the perfect colour for the Cake.
The cake was ready in a jiffy and was very yummy. I liked this much more than the one I made before as I used Whipped cream this time while the previous time I used a readymade frosting.
Friday, January 23, 2009
Cheppi Surnalli
Surnalli is a thick dosa. Cheppi in Konkani means bland. That doesn't mean this dosa has a bland taste. It is only used to differentiate it from Godi Surnalli which is sweet. As I have mentioned before Surnalli can be made using watermelon/cucumber/ash gourd. This time I have used cucumber.
Surnalli is my favorite among all dosas. Amma always made the sweet version of surnalli as she knows that I love it. But recently I tried the Cheppi Surnalli and we liked this one too.
Ingredients:
Rice - 1 cup
Dessicated Coconut - 1/3 cup
Cucumber - 1 small or half of big one.
Poha (thick or thin) - 1 /4 cup
Bread slices - 2
Salt
Turmeric - pinch(optional)
Soak rice for 2-3 hours. Remove the skin of cucumber and chop it into small pieces.
Soak the poha and bread in little water.
Grind all ingredients except salt into a fine batter adding water. The batter shouldn't be too thin. The consistency of the batter must be thicker than regular dosa batter.
Ferment overnight or atleast 8 hrs.
Next morning add salt and mix well.
I also add a pinch of baking soda to the batter as the batter doesn't ferment well in winters.
Adding just a pinch of soda gives nice fluffy surnallis.
Heat a tava or non stick pan. Add a few drops of oil/butter. Pour a ladle of batter in the center of the tava. Do not spread the batter. Drizzle some oil on the sides. Cover and cook till it gets golden from below.
Serve with your favorite chutney or sambhar. Don't forget to top it with a dollop of butter.
You can also make small mini surnallis for kids.
Note: Surnallis are usually cooked only on 1 side. But I like to cook it on both sides. For making the sweeter version of this just add some jaggery in addition to the other ingredients while grinding the batter.
Sending this along with Undi to "Harvest the festival of Rice" event.
Also sending this to FIC - Yellow Event at TongueTicklers.
Labels:
Amchigele randap (Konkani Cuisine),
Dosa
Hummus
I had some leftover boiled kabuli channa after making Chole and I was in no mood to eat Chole the next day as well. Suddenly the idea of making hummus struck me. When I searched for the recipe I found that to make hummus you require tahini.
I didn't have tahini instead I added some sesame seeds. My silly experiment became sucessful and my hubby liked it a lot.
To make my modified hummus :
Blend 1 cup of boiled chickpeas with 1 tbsp of sesame seeds, little paprika, salt, 1 clove of garlic and some lemon juice. Add little water if needed.
Serve as a dip with nachos or chips.
Note: The original recipe has Olive oil also. As I did not have it I haven't added it.
I am sending this to JFI: Chickpeas event and also to Chutney/Dip Mania event
Thursday, January 22, 2009
Pizza
Who doesn't love a pizza. It happens to be the only western food that I love as it is not as bland as the other foods. So whenever we go out we look for pizza outlets.
During my initial days in US once we went to Target. After all the shopping we ordered a Cheese pizza. Compared to all the pizzas I have eaten till date, the target cheese pizza happens to be my favorite. It is a simple Cheese pizza but is very soft and rich. I haven't tasted such soft pizza elsewhere. But that day when I opened the pack there was a pizza with red roundels starring at me. I thought it to be tomato slices. To be sure I asked my hubby who was shocked to see the ham slices. We returned it back and luckily we got our money back.
Few months back my mil had come to visit us. On one weekend we set out to visit Manhattan. When we were hungry we settled at a pizza outlet. Hubby ordered Mushroom and Spinach pizza. When I was about to take a bite I noticed a red piece hanging from it. Again it was a piece of ham that got stuck to my veggie pizza. We had already cut the pizza so this time we couldn't get our money back. Nowadays I am very careful whenever we eat out. I thoroughly inspect the food before having a bite.
For making this pizza I have taken tips from Shilpa's Garlic Pizza and from Vah Chef's videos.
Ingredients :
For the base
Maida/All purpose flour - 1 1/2 cups
Whole wheat flour - 1/2 cup
Salt
Sugar - 2 tsp
Warm water - 1 cup
Oil - 2 tsp
Active dry yeast - 1 envelope
Take 1/4 th cup of warm water. The water should be warm not hot. Add the sugar. Mix and then add the yeast. Leave it to rise for about 10 min. Bubbles will appear which is an indication that yeast is active.
Then add the remaining water(warm) and salt.
Take the flours in a big bowl and add the water little by little and form a dough. Knead well. The dough will be sticky. Add the oil and again knead well.
Cover it with a plastic and rest in a warm place for an hour.
After an hour the dough doubles in volume. Punch the dough to remove the air.
Again rest it for half an hour.
Now spread the dough on a pan or pizza stone.
For the sauce
Tomato - 2 medium
Capsicum - 1/2, chopped
Garlic - 1 big, chopped finely
Butter - 1 tsp
Salt
Sugar - 1/2 tsp
Red chili powder - 1/2 tsp
Pepper powder - pinch
Make small cuts on tomato and put in boiling water for 30 sec. Remove and put in cold water. Peel off the skin. I cut one tomato into pieces and pureed the other one.
Heat butter in a pan. Add garlic and fry. Then add the capsicum pieces. Fry for a minute and add the tomato pieces. Fry and add tomato puree. Now add salt, sugar, pepper powder, chilli powder.
I also added 2 drops of red food colour. Cook till the desired consistency has reached.
For assembling a pizza.
I spread the dough on a non stick pan without a handle. Spread the sauce on top and topped it with onions, bell peppers, mushrooms, shredded cabbage and mozzarella cheese and dotted it with oil.
I heated the pan over a low flame for about 5 mins and then baked in oven at 450 F till the cheese melted.
Garnished it with chilli flakes, pepper powder and dried parsley.
With a remaining dough I made a thin crust pizza and topped it with paneer in addition to the toppings used above.
Both pizzas were absolutely delicious and it was a great experience to make it from scratch.
Note: Adding herbs like oregano and basil gives a nice flavor to the sauce. As I did not have any of those I haven't added it. I have used Imitation Mozzarella Cheese in place of Mozzarella as it is low in Cholesterol. I have also added a few pieces of fried garlic to the dough.
Update: I am sending this to Bread Mania event at Sindhura's blog
Labels:
Cooking from other blogs,
Pizza and Pasta
Wednesday, January 21, 2009
Undi (Steamed rice balls)
Undi happens to be a very popular breakfast item among Konkani people. But I had never made it in all these months that I spent in US. One reason was because I did not have a steamer to steam the balls. Back in India all Konkani houses have a steamer which is called a "Pedavan" which they use to steam idli, undi, pathrado(alu vadi), etc.
Amma(mom) and mummy(mil) both had told me many a times to steam in a kadhai or any big vessel. But since my hubby hates idlis I never took their advice seriously. The other reason for not making undi was that I always had a feeling that is difficult to make and that I won't get it right.
One fine day I decided to make undi for breakfast and steamed it in a cooker without keeping the weight. But after steaming when I opened the lid, some water had gone inside the vessel and I had to resteam it. When I told all this to mummy she again reminded me of the kadhai method. The same evening I steamed the remaining rice balls with her method and finally I got nice, extremely soft undis.
Ingredients
For the batter:
Rice(uncooked) - 1 cup
Coconut - 1/2 cup
Salt
Soak rice for 3 hrs in water. I soaked it overnight.
Grind it with coconut and water into a slightly coarse batter. When you touch the batter you should get a grainy feeling. Add salt.
For tempering:
Oil - 2 tsp
Mustard seeds - 1/2 tsp
Fenugreek seeds - 1/4 tsp
Curry leaves - 1 sprig
Dry Red Chillies (Bedgi mirchi) - 2 torn.
Heat 2 tsp of oil in a kadhai. Add mustard seeds and when they crackle add the methi seeds, curry leaves and red chillies. Then pour in the batter and keep stirring till it forms a soild mass.
Switch off the flame.
Make small balls (2 inch diameter) from this mixture and make a small depression on top of it. The mixture is quite hot so dip your hand in cold water while making balls.
Steam the balls in a steamer for 20 mins.
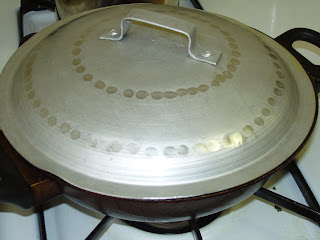
[I filled a kadhai with water. Put this on high flame. When it starts to boil place a plate with holes which fits on top of it. The water below should not touch the plate. Place the rice balls on top of the plate and cover the plate. The water evaporates fast so use a bigger kadhai/vessel and fill it with as much water as possible.]
Serve hot with chutney or sambhar.
Note: The rice balls can be made in advance and kept in the refrigerator and steamed just before serving. Mummy makes them with rice rava but since I dont buy the rice rava I followed my amma's version and made them using rice. Like all other preparations I have used dessicated coconut for this too. If using fresh or frozen coconut you may require a little more coconut.
I am sending this to Harvest: The Festival of rice event at Meetsudeshna's blog
Tuesday, January 20, 2009
Zebra Cake
Ever since I saw the lovely Zebra Cake on Ujwal's blog I was drooling over it. I couldn't make it for New Year so was waiting for an occasion. Finally I decided to make it for my father-in-law's birthday. My fil is thousands of miles away from us and I can't even send him a piece of the cake but all I wanted was an occasion to indulge in this yummy cake.
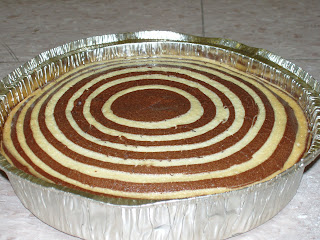
The cake is not as difficult as it looks. It just requires some extra efforts.
I made it with half of the quantities mentioned in the recipe and got a decent sized cake.
I baked it for the time mentioned in the recipe and when the knife inserted in the center came out clean I took it out.
I was so excited to see it rise so beautifully but the moment I took it out of the oven it became flat, almost the size it was before baking.
It still tasted very good and was very nice and soft.
The plain and Chocolate batter
The cake before going into the oven
Cake just out of the oven
The final piece
This recipe is definitely a keeper. The next time I make it I will add a little more sugar as we would have preferred it to be a little more sweeter. And will try with the entire quantities.
Labels:
Cakes,
Cooking from other blogs
Kurmura Bhel / Chanbure Pachadi
Kurmura/Mamra or puffed rice is known as Chanburo in Konkani. Pachadi is nothing but a simple bhel. This Pachadi can be made in a jiffy and is low on calories which makes it a perfect evening snack.
Ingredients
Kurmura - 2 cups
Onion - 1 small, chopped
Tomato - 1 small chopped
Sambhar powder - 1/2 tsp
Oil - 1 tsp
Lemon Juice
Coriander leaves chopped
Salt
In a pan take a tsp of oil and add the kurmura. Put this on a low flame and fry for around 5 mins (till the kurmura become crisp). Switch off the flame and add a little salt and the sambhar powder. Mix well.
Transfer this to a bigger bowl and add the chopped onions and tomatoes. Add the coriander leaves and sprinkle some lemon juice on top. Mix well and add more salt if necessary. Thats it. Kurmura bhel is ready to serve.
Variations:
I also add sev or some farsan to the bhel at times. If Sambhar powder is not available chilli powder can be used. One can also used finely chopped green chillies. A pinch of chat masala can also be added.
I am sending this to EFM Savouries event taking place at Srilekha's blog.
Labels:
Healthy Food,
Quick and easy,
Snacks
Wednesday, January 14, 2009
Tila Undo (Sesame Ladoo)
Til Gud Ghya Godd Godd Bola.
Happy Makar Sankranti to fellow bloggers.
Til laddoos happen to be my second favorite after Churma Undo (Wheat Four Ladoos). But I only prefer the ones which have the right amount of stiffness. I myself have no experience in making these ladoos so the next thing was to log in Aayi's recipes. It happens to be the first site that I look for any recipe. Luckily I got the recipe.
I followed Shilpa's recipe but used only half the quantity of the original recipe as I usually do when I fear that I may mess it up. But to my surprise I got perfect Til laadoos. They were neither too soft nor rock hard. Just perfect.
Ingredients
White Til (Sesame) - 1/2 cup
Cashewnuts - 1 tbsp roasted and coarsely powdered (optional)
Jaggery - 1/3 cup (1/4 cup according to original recipe)
Cardamom Powder
Ghee
Wash Til well. Drain all water and spread the til on a kitchen paper and let it dry for 15-20 mins. Then fry the til on a medium flame till they pop up and lend a nice aroma. Keep aside.
In another pan take the Jaggery and add 2 tbsp of water and put it on a medium flame. Keep stirring.
Take some water in a plate and put a drop of melted jaggery in the water. If it stays as a drop then the jaggery is ready. (If not heat for some more time.)
Now add the roasted til ,cashew nuts and cardamom powder. Switch off flame and mix well.
Take a big spoonful of the mixture on a plate and keep the remaining covered.
Grease palms with ghee and make small balls of 1 inch diameter.
The mixture is very hot at this stage so be careful. I almost burnt my palms so came up with one more tip.
Take a small spoon and spoon out small portions from the big spoon separately on a plate. Let it cool for a minute and then shape the individual portions into ladoos.
Repeat the procedure. Dont keep the mixture for long as it hardens quickly.
I could make 29 small ladoos from 1/2 a cup of til.
If you find making ladoos difficult press the mixture on a plate. Cut into desired shapes and make chikkis.
Thanks a lot Shilpa.
Tuesday, January 13, 2009
Sprouted Chana Bhel
While passing by the petrol pump near my home a nice aroma always caught my attention. No not from the petrol pump. I can't tolerate the smell of petrol or diesel. A hawker used to sell chana Bhel near its entrance . I dont know if it is really called chana bhel or something else. All I know is he boiled green chanas and added onions, tomato, potatoes and some special masala. All this priced at just Rs 2 (=5 cents). Maybe it still costs the same. But the only problem was that he was always surrounded by the men from the nearby garages so it felt awkward to buy those chana. But I used to request my brother H to bring it for me.
I had some kala chana lying in my pantry from a long time. I wanted to use it but didnt know what to do with it. So i thought of sprouting it. Again the question arose what to make with the sprouted ones. Suddenly the idea of making the bhel came to my mind. And here's what i did.
Ingredients:
Kala Chana/Green Chana - 1/2 cup sprouted
Onion - 1 small, chopped
Tomato - 1 small, chopped
Boiled Potato - 1 medium, cut into cubes
Lime juice
Chilli Powder - 1/4 tsp or less
Chaat Masala - 1/4 tsp
Coriander leaves - for garnish
Salt
Boil the Sprouted Chana till soft but firm.(around 1-2 whistles in pressure cooker). Drain the water from the chana. In a bowl take chana and add all other ingredients. Taste and adjust seasonings. Enjoy your nutritious bhel with a cup of tea or as an appetizer.
Note: It is not necessary to sprout the chana. You can just soak the chana in water and boil it. But sprouting makes it healthier. The original(Chana wala bhaiya's) version has green chana without sprouts. This bhel can also be made with Moong Sprouts. Just use sprouted moong in place of Chana. Moong need not be boiled.
This is a Zero Oil Recipe which makes it a perfect diet food.
Sprouts
Pulses have 20-25% protein by weight. Sprouting further increases the protein, vitamins and amino acid content and decreases the undesireable constituents.
To make sprouts, wash and soak the desired pulses in water for 8 hrs or overnight. Next morning drain all water, put the pulses in a colander and cover with a plate. Keep this in a warm place. After few hours you will notice small sprouts emerging from the seeds. Keep checking from time to time and sprinkle few drops of water if it looks too dry. The time for sprouting varies for different kinds of pulses. Sprouts can be made in advance and stored in ziplock bags in the freezer for future use.
I am sending this to My Legume Love Affair event which is the brain child of The well seasoned Cook Susan and is hosted by Srivalli.
Also sending this to JFI: Chickpea event
Monday, January 12, 2009
Strawberry Milkshake
Strawberries are one of the most beautiful fruits created by God. In spite of that I rarely buy Strawberries as they are usually slightly sour in taste. But once while shopping with my friend Vinita, she told me to try this milkshake and it tasted yum.
Just add 4-5 strawberries with a cup of cold milk and 4 tsp of sugar in a blender. I also added a spoonful of Butter Pecan ice cream to enhance the taste. Blend till it is smooth.
Serve immediately.
If kept for longer time the acids in strawberry act on the milk and start curdling it.
Note: This milkshake can be made without ice cream but if using ice cream Vanilla flavor would be the best.
Labels:
Beverage,
Healthy Food,
Quick and easy
Friday, January 9, 2009
Cabbage Ambado/ Cabbage Vada
Ambado means Vada in Konkani. I learnt this from my mil. To keep the vadas soft I have added a little urad dal.
Ingredients
Small piece of Cabbage chopped finely
Rice - 1 vati (1/2 cup)
Tur or Chana Dal - 3/4th vati
Urad Dal - 1 tbsp (optional)
Dry Red Chillies (Bedgi Mirchi) - 3-4 nos
Hing - a pinch
Salt
Oil for deep frying
Soak the rice and dals in water for atleast 2 hrs. Grind rice and dal with red chillies to a slightly coarse paste adding only little water as needed. The paste should be thick. Add the cabbage and salt and hing. Make small flat discs. Add more cabbage if it becomes difficult to shape them. Heat oil and deep fry the vadas. Remove vadas on a paper towel. Enjoy as a snack with ketchup or chutney or as a side dish with dal and rice.
One can also make this with methi leaves or using a combination of cabbage and onion.
This is my last minute entry to Trupti's Winter Treat event.
Labels:
Amchigele randap (Konkani Cuisine),
Snacks
Wednesday, January 7, 2009
Veggie Burger
I am not very fond of burgers for reasons not known to me so I have never ordered a burger for myself while in India. But after coming to US i wasn't left with too many vegetarian options and I had to order it once or twice. But it was quite bad or may be I was just not used to eating it.
But when I saw it on Sailaja's blog I couldn't resist myself from trying it. I brought the lettuce and bread crumbs specially for making this burger. I followed all her steps except one. Sailaja had baked the potatoes in a microwave and pressure cooked the other veggies.
But I boiled potato cubes with the rest of the veggies so I couldn't squeeze much water out of the veggies which was an important step. So when I tried to make patties they were a little more soft and difficult to handle. However I managed to make the patties. I did not add any Ranch Sauce as i didn't have it. I just added some red chilli sauce with tomato ketchup and I loved this burger of mine.
I refrigerated the remaining veggie mixture and made burgers the next day also and this time the mixture wasn't that soft and i could shape it into patties easily.
I plan to make more burgers in future but am still hesitant to try it again in a restaurant. This time i had deep fried the patties but the next time I will shallow fry it.
Thanks Sailaja for your lovely recipe and your step by step illustrations which changed my attitude towards this food to a certain extent.
Labels:
Cooking from other blogs,
Snacks,
Street Foods
Oats Upma
Oats are a type of cereal grains which were previously used as livestock feed but is gaining popularity as one of the most healthy foods for human consumption due to its high fibre content. It can be a good source of proteins for vegetarians. It is also known to reduce cholesterol.
I never got a chance to see or taste Oats while in India although it may be easily available everywhere these days. Even after coming to US i had not purchased oats for many months. Then once when I was chatting with my friend S, she told me to include oats in our diet to obtain its benefits. S is a dietitian and I was taking few tips from her. So finally I brought a pack of oats.
This Upma is the only dish that I have made from oats till now. Hopefully in 2009 i will learn more recipes from Oats.
Ingredients
Instant Oats - 1/2 cup
Water - 1 cup
Frozen Peas - 1/2 cup
Onion - 1 small, chopped
Chopped Tomato - 2 tbsp
Curry Leaves - 1 sprig
Mustard Seeds - 1/2 tsp
Urad Dal - 1/2 tsp
Chana Dal - 1/2 tsp
Green Chilli - 1 slit
Lemon Juice
Coriander Leaves/Cilantro - for garnish
Oil - 2 tsp
Salt
Boil the water in a pan.
In the mean while, heat oil in another pan. Add the mustard seeds. When they crackle add the urad and chana dal and fry till they turn golden. Then add the curry leaves and the onions and fry till the onions turn slightly golden. Now add in the tomatoes and cook till they turn soft. Pour in the boiling water and add the peas. Finally add the oats and some salt. Cover and cook till all the water is absorbed. Keep mixing once or twice in between to prevent it from sticking to the bottom. Top it with some lime juice and cilantro. Serve hot.
Variations: If fresh peas are used cook them for longer time in water before adding. One can also use chopped carrots, beans or other veggies in place of peas.
Subscribe to:
Posts (Atom)